Tutorial: Using iShowU HD Pro Screen Captures with Adobe Premiere Pro CC
iShowU, a Mac-based screencam app from ShinyWhiteBox.com, 是快速的, 易于使用的, and inexpensive; here's a look at how to use it to produce pro screencams that you can import into Adobe Premiere Pro CC to integrate into your video projects.
iShowU HD Pro是由ShinyWhiteBox创建的高品质屏幕捕获程序.com. It's quick, has an 易于使用的 interface, it's relatively inexpensive ($59.95), and it's compatible with Mac OS X 10.7. 在本教程中, I'll demonstrate how to create a screencam with iShowU HD Pro, 然后将其导入Adobe Premiere Pro CC以与现有的视频片段混合. 我将演示的工作流程在我们工作室过去的项目中运行良好,包括 screencam-based教程 at the beginning of my previous article for 流媒体 Producer.
我使用运行OS X Mavericks和iShowU HD Pro v的MacBook Pro制作了本教程的示例项目. 2.36.
一些初步建议
在开始录制iShowU屏幕截图(或任何其他屏幕截图)之前,请记住以下四个一般提示, 就此而言):
- Close unnecessary applications
- 使用缓慢的鼠标移动
- Know the dimensions of your final video
- 练习和准备.
Setting Screencam Parameters in iShowU Pro HD
图1(下面) shows the iShowU Pro HD UI that you'll see when you launch the application.

图1. The iShowU Pro HD UI as it appears after you launch the program. Click the image to see it at full size.
Going from left to right, let's take a look at our options. We'll begin with the Capture area (top left in 图1). 在这里,您可以通过“选择”下拉菜单选择要录制的屏幕区域. To customize, choose Set size to bring up the screen shown in 下面的图2,您可以在其中拖动边界框的边缘以绘制要捕获的屏幕区域.

图2. Customize the area of the screen you want to capture here. Click the image to see it at full size.
或者,您可以在“选择”下拉菜单中选择可用的预设选项(下面的图3) to choose the portion of the screen you want to capture. 对于这个例子, we know we're working with a 1920x1080 timeline, 所以我们将选择与视频大小相同(1920 x 1080)作为我们的屏幕捕获记录大小.

图3. Choosing a capture area size from the Choose pull-down.
输出视频下拉为您提供了许多选项,用于设置输出视频的参数. We'll start with the first, Change size (下面的图4). 对于这个项目, 我们希望1920x1080匹配Premiere Pro项目,我们将导入这个屏幕截图, so I'll choose Same as capture size.

图4. Choosing an output size that matches the capture size.
Next we'll look at Change format. 对于这个项目, for Change format we'll select Apple ProRes422 (下面的图5). JPEG is a good choice if you're capturing a still image rather than a video. You can go ahead and use H.264 if you want to reduce your file size, but ProRes 422 allows us to maintain the highest quality possible.

图5. Choosing ProRes 422 output to maintain the highest quality possible.
Finally, we'll change the frame rate to 29.97 (下面的图6) because this is frame rate we'll be working with in our Premiere Pro project.
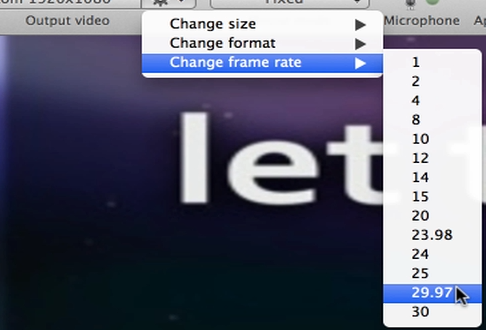
图6. Setting the frame rate to 29.97 to match our Premiere Pro project.
Moving on to Mouse Mode, we'll select the default, Fixed (下面的图7). You can explore the other options in other iShowU tutorials.

图7. 选择固定鼠标模式.
For now we'll leave Microphone and Applications alone; we'll adjust these when we customize advanced settings.
Just to the right of Mouse Mode you'll find Keys. 按键是iShowU HD Pro提供的一个很好的功能,它允许你在录制时向观众展示你正在按的按键. This is useful for educational videos or to show keyboard shortcuts. 向右移动, we'll leave Camera off for now, 但如果你想在截屏过程中用网络摄像头录下自己的画面,你就需要启用这个设置.
转到媒体(下面的图8), this is where you can import media such as still images, or anything else on your system into iShowU HD to augment your screencam.

图8. Accessing media assets on your system with Media selected. Click the image to see it at full size.
相关文章
在本教程中, we'll look at how to create screencams with TechSmith Camtasia, 然后将它们导入到Adobe Premiere Pro中,将它们合并到您现有的Premiere Pro项目中,以创建无缝结合屏幕截图和高清镜头的专业质量教学视频.
这里有三个快速的技巧,将简化你的标题工作流程在Premiere Pro中,当你创建你喜欢的风格,并希望使用他们一致,而不是每次重新发明他们.
New SpeedLooks in SpeedGrade, Mask Tracker in After Effects, Sync Settings in Adobe Media Encoder, improved multicam in Premiere Pro, expanded UltraHD/4k support, 和更多的
使用Adobe Lightroom 5对单反视频文件进行色彩分级和应用元数据既简单又高效,可以使现场切换者进行最少的编辑, 编辑新手, and pro editors exploring non-traditional workflows.
最近升级到Adobe CC可以很容易地在Adobe Premiere Pro CC中应用分级外观,并通过Premiere Pro CC和SpeedGrade CC之间的无缝往返匹配不同色温的镜头.
在最后一轮音频编辑冠军iZotope RX 3和Adobe Audition CC之间, we compare the two audio editors in noise reduction and reverb/echo reduction.
In this first installment of a two-part series, Jan Ozer比较了iZotope的新RX 3专业音频编辑器中的衰减和裂纹和pop-removal功能,以Adobe Audition CC中的并行功能.
Exploring 3 new key features in Audition CC, 最新版本的Adobe专业音频编辑应用程序:消除嗡嗡声和其他不需要的可变频率噪音的声音去除, 响度雷达仪表,用于匹配和坚持广播音量标准, and Automatic Speech Alignment for ADR.
If you ever find yourself having to render multiple sequences from Premiere Pro, there's an easier way to do it than by using the Premiere Pro Export control. 本教程将解释更容易和更有效的方式使用Adobe媒体编码器.
这里是一个快速教程的Premiere Pro CC用户如何迁移编码预设,您创建自定义和精简编码在Adobe Media Encoder CS5/6到Adobe Media Encoder CC,这样你就可以捡起你离开的地方.
在本教程中,您将学习如何使用刚刚发布的Adobe Premiere Pro CC中的新封闭字幕功能创建和编辑行业标准的视频封闭字幕.
两种类型的噪音会降低你拍摄视频的音频:一种是随机的噪音,比如麦克风的咔哒声和砰的一声, and consistent noises like white noise or air conditioning hum. This tutorial demonstrates how to remove both of them in Adobe Audition CS6.